In the current era, there are two most popular email applications are Office 365 and Microsoft Outlook. However, Office 365 is the web-based program which stores it’s all data in the cloud. It also allows users to access data from anywhere at any time. It provides some additional features like file sharing, working with mobile phones, etc. Being a cloud service, Office 365 data are prone to be hacked or damaged because it is an internet-based service. Thus, in order to prevent the Office 365 data from corruption, first users have to take backup of their data items. For backing up, it is required to save all information in the desktop-based email application i.e. Outlook. Therefore, in this article, we are going to show you how to export Office 365 to PST file format. First, let’s have a look at a user’s query to understand the need to migrate the office 365 mailbox to Outlook PST format.
“I am using Office 365 since 2015. That is why I have a lot of important emails, and contacts saved in my account. But now due to some personal issues, I don’t want to use Office 365 anymore. Keep remembering to avoid cloud security risks when moving to office 365. So, I want to move my all crucial data into some other desktop-based email clients. So, would anyone please give me a perfect and best way to export Office 365 Mailbox to PST format?”
Why to Export Office 365 to Outlook PST?
There are many reasons to export the mailboxes from Office 365 to PST. Some of the causes are discussed here:
- If the data gets corrupted, then normally it is not possible to recover. In this situation, data can be retrieved back if the user has a backup of Office 365 mailboxes in PST format. So, it is required to export Office 365 data to Outlook PST data file format.
- Archive Emails in Office 365 to PST conversion is needed if the data stored in the cloud is hacked, and the hacker made some irrelevant changes. In this case, your data will be safe in the backup files.
- When a person has accidentally deleted some important emails of Office 365, then the lost data can be retrieved back if the backup of Office 365 mailboxes is available in the PST format.
How to Export Office 365 to Outlook PST?
1. First of all, we have to give the permission to access mailbox & by using that mailbox, you can easily access the Outlook. Now, open the Start menu & search for PowerShell then select it and type the following commands in it:
- Import-Module Msonline, then
- $exsrv = Get-Credential
- $session = New-PSSession –ConfigurationName Microsoft.Exchange –Connection Uri https://outlook.office365.com/powershell-liveid/ -credential $exsrv –Authentication Basic –AllowRedirection.
- Import-PSSession $Session
- Add-MailboxPermission –User:user1_abc@email.com –Identity abc@email.com –AccessRights FullAccess -InheritanceType all
2. In this step, you have to configure offline setting after enabling the cached exchange mode & set to keep all emails offline. For doing this, perform these steps:
-
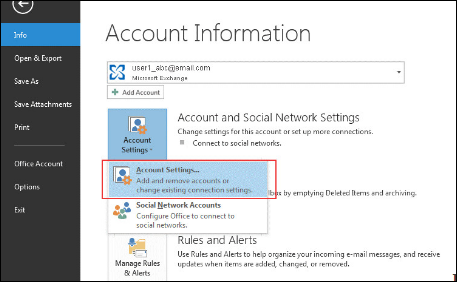
- To start the process, go to the File menu.

-
- Then, select Info >> Account Settings.
-
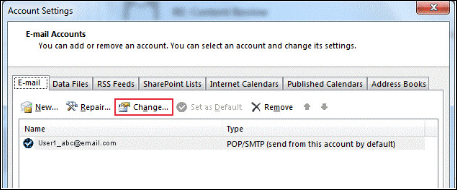
- Now, an Account Setting window will open, click on the E-mail tab >> Change button.
-
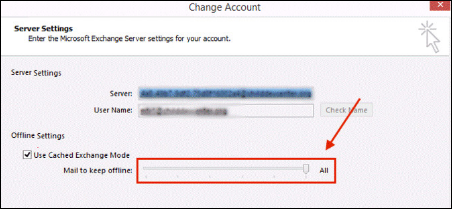
- In the Next step, a Change account window opens in fronts of you. Now, click on the checkbox next to Use cached exchange mode & set the Mail to keep offline.
Next, use the Import-Export wizard to export Office 365 mailboxes to Outlook PST file. Just go through with the following steps:
-
- First, click on the “File” menu of Outlook program.
![]()
-
- After that, click on theOpen & Export >> Import/Export.

-
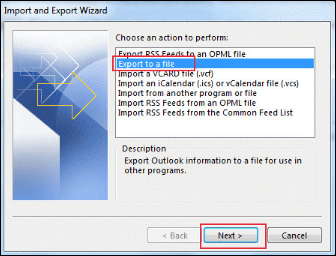
- Now, from the Choose an action to perform, select “Export” to a file and click on “Next” button.
-
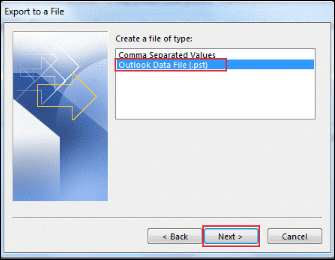
- Now, from the Export to a File, Select Outlook Data File (.pst) and click on “Next” button.
-
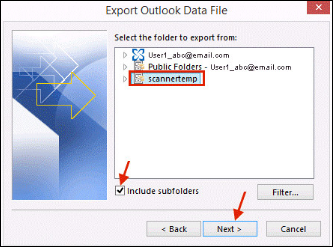
- In the section, select the folder to export and don’t forget to check the checkbox Include Subfolders. After selecting any folder just click on “Next” button.
-
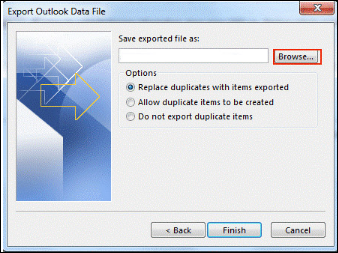
- Now, inside the section Save the Exported file, click on the “Browse” button to select the path for exporting the mailbox from Office 365 to PST.
-
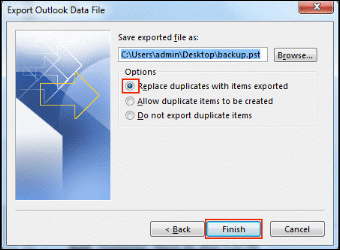
- In this, select an option for exporting from Options section and click on the “Finish” button.
-
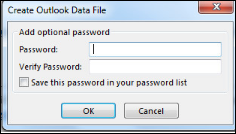
- Now, set a password. If you don’t want to set a password then just click on “OK button to Export Office 365 mailbox to pst.
-
- As you checked the exported Outlook Data File (.pst) at the selected location. Then, you can compare the size of PST file with the mailbox size in Office 365.

Finally, you have to remove all the permission assigned to the user account & also removed then session as well using following commands running in PowerShell.
- Remove Permission.
- Remove-MailboxPermission –User user1_abc@email.com –Identity abc@email.com –AccessRights FullAccess.
- Remove PowerShell Session.
- Remove-PSSession $Session.
An Alternatives to Export Office 365 Mailbox to Outlook PST
The above discussed manual method can migrate the Office 365 mailboxes to PST, but this method is very long and hard to understand for non-technical users. So, we also looked for an alternate solution to move mailbox items of O365 to Outlook data file in case of above solution failure. In this case, it is suggested to use Office 365 Export tool for the easy migration process. There are many advanced features integrated with this tool which are discussed in next section.
Features of Office 365 Export Tool
-
-
- Easily migrate Office 365 mailboxes to PST as well as MSG, EML.
- Option to Log into both Admin account and User account.
- The software offers different naming convention options.
- Feature to apply Date Filter option to selectively migration.
- Compatible with Windows 10 and all lower versions of OS.
-
Summing Up
Here we have discussed on why to export Office 365 to Outlook PST. In addition, the manual and alternative solutions are also described. So, we can conclude that the manual solution to export Office 365 Mailbox such as emails, calendars, and contacts to PST has some limitations. So, it is advised to use a commercial tool for the better result.